Tuesday, December 31, 2013

Happy New Year!

I just wanted to wish everyone a Safe and Happy New Year! It's snowing like crazy in my neck of the woods. Tonight my family and some close relatives got a couple of rooms at a relatively close hotel. So the kids get to play in the pool or one of the rooms and the adults get a little time to unwind. 

I had great fun this year making all the Burley Sew videos and sharing with everyone. I look forward to what 2014 will bring. I really never though so many people would be interested. I am working hard to grow my skills and knowledge so I can do better. Thank you for all your kind words and for helping me grow in many ways. Happy 2014 all!!


Wednesday, December 25, 2013

Last Minute Embroidery Hoop Christmas Ornament and Holiday Wishes

Happy Holidays everyone! I am posting early this week. I hope you enjoy the video and more importantly I hope you enjoy the rest of 2013! I will see you in January!. Have a safe New Year!

S0- Do you need a last minute, super easy gift idea? Well today I have an awesome one that you can do in less than 15 minutes provided you have the materials. If you don't you can pick them up for a few dollars.

Using a free Christmas tree design I found (link is below), a 3" embroidery hoop and some ribbon, I made this very likable ornament. I hope you enjoy it too! I would also like to wish everyone a safe and happy Holiday season. Thanks everyone for making it a great year, I can't wait until next! This is this fridays video early so I will see you all next year on January 3rd. 


To see the video click HERE!
Enjoy and Merry Christmas!

Friday, December 20, 2013

Brother Christmas Stocking Embroidery Design w/ Special Guest!

This week join me and a very special guest as we look at one more Christmas Embroidery Design. This is a great design if you need a last minute present. Simply stitch it out on your Brother Embroidery Machine and you can turn it into a placemat, napkin, decorative towel or even a Christmas Tree Ornament. Merry Christmas and Happy Holidays to you all!


You can view the video HERE.
Enjoy!

Friday, December 13, 2013

How to make a Dr. Who Tardis (Police Call Box) Christmas Ornament Using Sewart

Today I am making a Dr. Who Tardis (Police Call Box) Christmas Ornament for my son. I have made a vector image of the call box and then used a trial version of SewArt to digitize the image into a .PES file. This is the first time I have used SewArt and I think it did a good job. Once I have the embroidery file I will stitch it out and use fusible interface to create the ornament.
You can view the video HERE.
Enjoy!

Monday, December 9, 2013

Free embroidery Designs just in time for the Holidays!

I was poking around the Brother Sewing site and I came across an area that had fee embroidery designs. All you have to do is enter your name and email as registration. There are many different designs to choose from. I would say there are well over a hundred designs that you can download as a .PES file. The color codes are supplied along with the stitch count and size. Be sure to check the size to make sure you have the right size hoop!

If you need the design converted to different file format or need to know how to import it to your machine you can visit my YouTube Channel Burley Sew. I have lots of free videos on machine embroidery. I will try to bring you more free stuff as I find it on the web in the future so keep checking back.

Click HERE to go to the Brother site and then click on Free Designs. Enjoy!


Saturday, December 7, 2013

It's beginning to look a lot like Christmas! So today I have a do it yourself tutorial on how to make your own quilted Christmas Stocking. We take a look at how to quilt the pieces, make the pattern, embroider a name with border and put it all together.


You can view the video HERE!
Enjoy!

Saturday, November 30, 2013

Easy Beginning Applique Tutorial Using Fusible Interfacing

In todays video I show how easy it is to Applique using fusible interfacing. You can really add dimension and pop to a project using different applique techniques and the use of fusible interface makes it very simple.


You can view the Video by clicking HERE.
Enjoy!

Friday, November 22, 2013

Brother Programmed Christmas Holiday Santa Neol Embroidery Design Stitch

In this video I show how to use one of the programmed stock embroidery designs. The one I have selected is Christmas Holiday themed. It is Santa holding garland that says Noel! This is a very easy project that is specific to owners of embroidery machines that come preloaded with the design, namely the Brother SE400 and possibly a few other Brother embroidery machine models.


You can view the video by click HERE.
Happy Holidays!

Friday, November 15, 2013

Brother Programmed Thanksgiving Turkey Embroidery Design Stitch

In this video I show how to use one of the programmed stock embroidery designs. The one I have selected is Thanksgiving themed. It is a turkey! This is a very easy project that is specific to owners of embroidery machines that come preloaded with the design, namely the Brother SE400 and possibly a few other Brother embroidery machine models.

 See the video by click here.

You can view the video by clicking HERE.
Happy Thanksgiving everyone!

Wednesday, July 31, 2013

Turning the Corner While Overcast Stitching

Today we take a look at how to turn a corner while using an overcast stitch.


There is an easy way to turn a corner while you are sewing around the edge of a piece of fabric. Let me show you how.

Often when you are sewing you will find the need to change the direction of stitch without stopping and restarting the stitch.  Whether it's an overcast stitch like in this case or just working with material that requires such action, there is an easy way to do it.

In this example we need to turn the corner with our overcast stitch. 

When you get to the corner simply lower your needle into the fabric and raise your presser foot. Now you have a pivot point that you can easily turn your fabric on. 

Make sure that you are in the spot that you want to continue sewing from. Because we are using an overcast stitch I want to make sure that after I turn the fabric I am the correct distance from the edge for my overcast. This way when I continue the next leg of sewing I will have a nice even and straight stitch.


It's as easy as 1-2-3!
  1. Lower the needle and raise the foot to make your pivot point.
  2. Pivot your fabric.
  3. Lower the presser foot and continue sewing.

I hope you enjoyed this post. If you want to see this in action you can check out my video HERE. This particular action is at the 4 minute 13 second mark. 

If you have comments please leave them below.

Thank you for visiting my blog!


Tuesday, July 30, 2013

Zigzag to Overcast or Overlock

Today we take a look at what overcasting is and how to do it using a zigzag stitch.

An overcast stitch locks the edges of the fabric so it doesn't fray. You can see in the photo above what material looks like with an overcast stitch. 

The piece of fabric above has a raw edge (no overcast stitch). Raw edges have a tendency to fray.

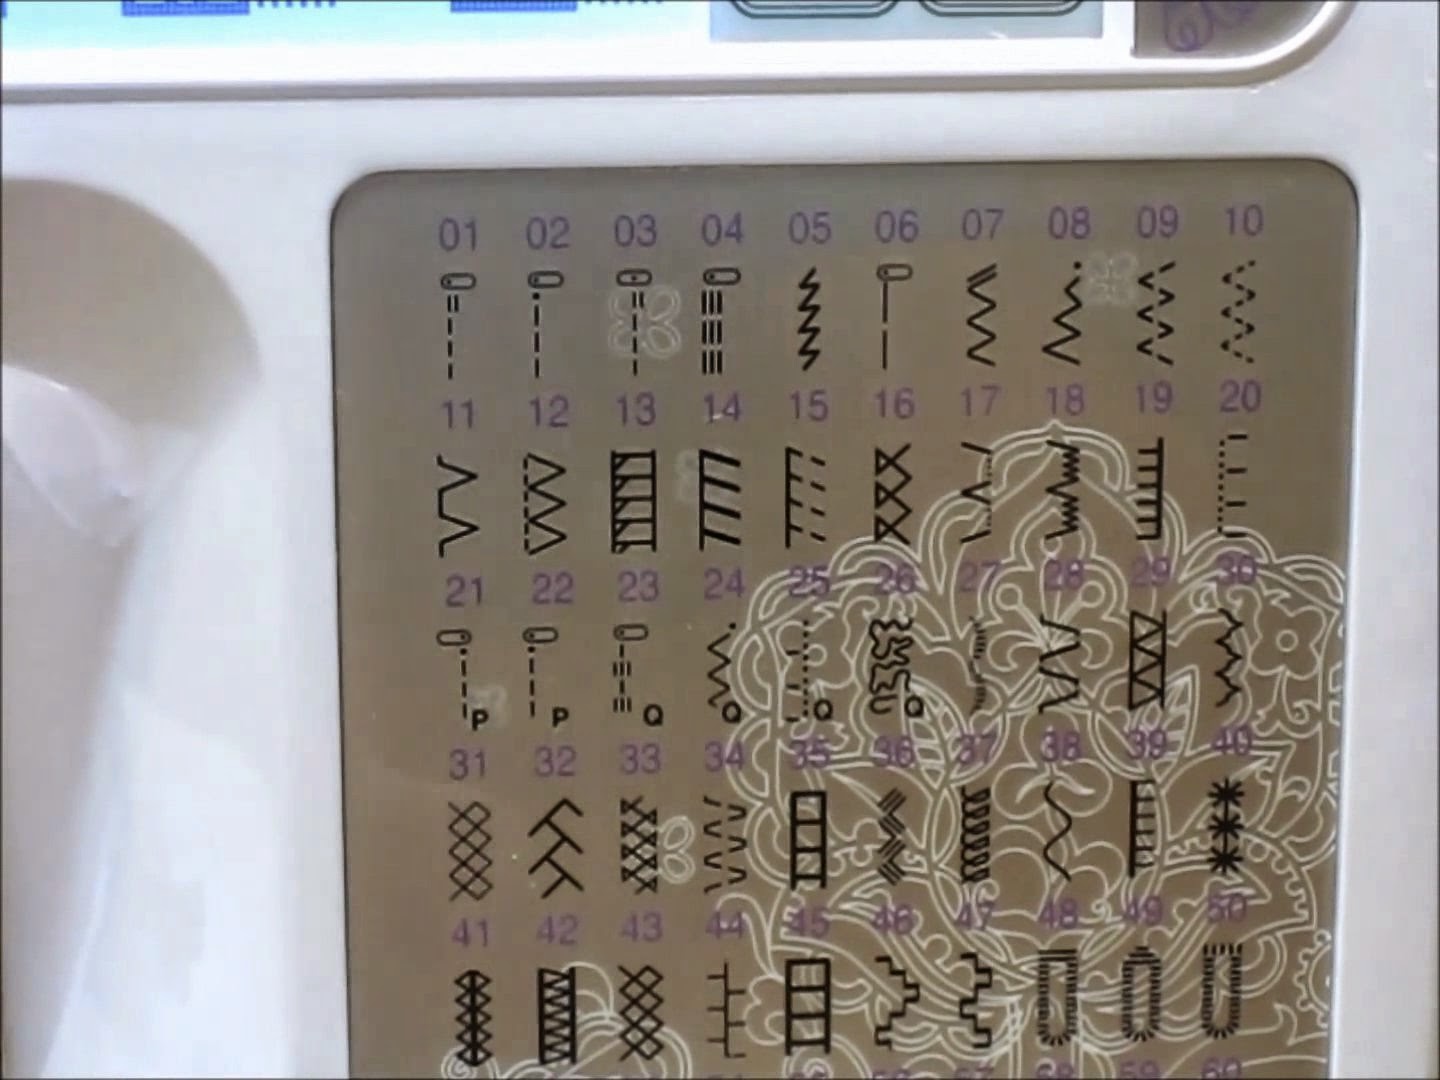
These are the stitches that are available on my machine the Brother SE400. Numbers 7 through 16 are most commonly used for overcasting. Some of these stitches are used for thicker materials or for different types of looks. For this job I am using a simple zigzag stitch (number 7 above).

Above you can see that I have the zigzag stitch selected. You can also see that it uses the standard "J" foot as indicated in the upper left part of the screen.

When you overcast with a zigzag stitch, the needle has two downward positions, left and right. You want the right down stroke in this case to fall off of the fabric. When I start out my overcast stitch I like to put the needle in the down position. I slide the material under the raised presser foot until it barely touches the needle. This way I know where my drop off is. 

When the needle repositions to its left downstroke you want the needle to come down in the fabric.This action wraps the edge of your fabric with the top thread and the bobbin thread creating the overcast.

You can see (behind the presser foot) as I sew the zigzag stitch and keep the right downstroke just off the edge on the fabric, it creates a nice even overcast stitch. You also want to pay attention to the tension setting so the fabric does not bind up unwantedly. 

As you are sewing, fray from the material will poke out the edge of the overcast stitch. You can simply go around the edges and trim these if needed for aesthetics. Be careful not to trim too close or you could accidentally cut your overcast stitch.

If you would like to see see a video of how to use a zigzag stitch to overcast you can click HERE

If you have comments please leave them below.

Thank you for visiting my blog!


Sunday, July 28, 2013

Walking Foot- Very Handy

Today's post is all about the walking foot. If you ever machine sew think materials. have the need to sandwich material together or do straight line quilting this addon is a must have. Let me tell you how it works. 


The walking foot attaches to the presser foot bar like most regular feet. It has a holder that hooks over the presser foot bar and is then secured by the presser foot holder screw. Additionally it has a lever with a "U" shaped notch the slides over the needle clamp screw shaft as you can see at the top of the second picture. By the lever attaching in this way, this is what makes this wonderful foot work. Let me explain how.


As the needle moves up and down so does the lever that is attached to it. Inside the body of the walking foot there are mechanisms that connect to the foots "upper feed dog". This creates a moving feed system that holds and moves fabric between the presser foot's upper feed dog and the machine's feed dogs. As the needle raises, the walking foots feed dog goes down to press the fabric against the sewing machines feed dog. The motion of the walking foots feed dog is elliptical, so as the sewing machine pushes the material back to position for the next stitch so does the walkings foot. This allows the material to move evenly as you sew.


I hope you enjoyed this post about the Walking Foot. If you would like to see it in action check out my video HERE

If you have comments please leave them below.

Thank you for visiting my blog!

Saturday, July 27, 2013

DIY Headband- Recycling an old shirt.

DIY Headband by recycling an old shirt.
Find an old shirt.

I measured 12 inches from the bottom hem. 

Mark your cut line.


Cut along your line

Nice straight cut complete.

Now cut the "tube" of fabric to make a rectangle.

Trim the edges to square up your piece of fabric.


Fold in half the long way.
And again...
One more time.


This is about 1 3/8 (35mm) wide.

Pin for sewing.


Now we have our sewable piece.

Use a sharp needle.

If you have a walking foot it helps with thick material.

Check your stitches.

Cut the ends so you can bind them with a zigzag stitch.


Bind using a zigzag stitch


Fold over each side. Kind of like a knot, but so that both ends attach on the same side.


Pin at the desired length.

Use a back and forth stitch at the corners to attach on each side of the pin.


You can now decorate or embellish however you like. 

If you want to see this in video format click HERE.

If you have comments please leave them below.

Thank you for visiting my blog!